
An irresistible Easter bunny
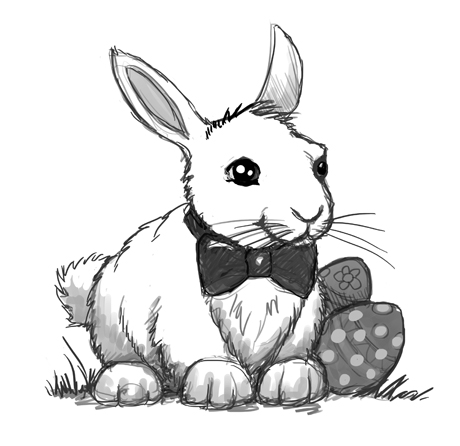 How about an Easter bunny! This drawing may be a little more complicated than some of the previous tips we have done, however, it is great to challenge ourselves!
We start by looking for major shapes. We will mostly be working with circles, as bunnies are soft and cuddly creatures with very round shapes.
As you draw, pay close attention to the pressure you apply with your pencil because you’re going to do some erasing later on. This is why we draw very lightly to begin with.
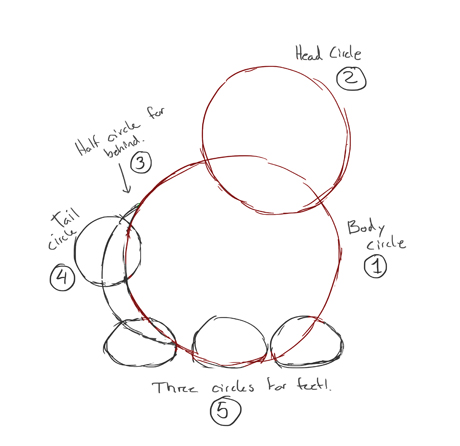
Step 1: We need a circle for the head, as well as a larger circle for the body. Look closely at my drawing and copy the overlap of the two red circles. The circles don’t have to be perfectly round. Also, you just need to lightly draw them in as guidelines for the body.
Afterwards, add a half-circle on the left side of the big circle for the rest of the body. This is going to be the hind part of the bunny. Now, draw a circle onto this half-circle where you want the tail to be. Bunnies have fluffy tails, so, again, circles are perfect! Lastly, you want to add three slightly squished circles on the bottom for the feet. Hopefully my drawing will show you where to place everything.
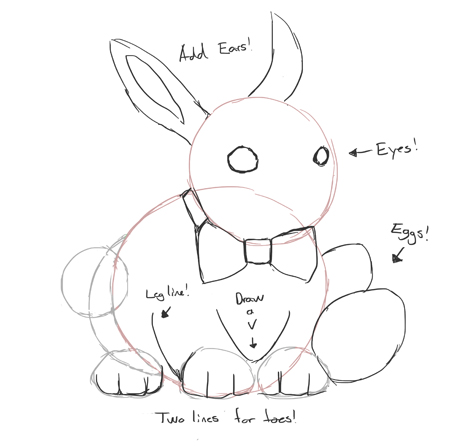
Step 2: I have faded the first shapes that I drew so that you can see what I am drawing now. Continue to draw very lightly, so that lines can be easily erased later. Start by adding ears on top of the head. Bunnies have long ears, so add two long shapes for these. Then, just about in the middle of the head-circle, add two circles for eyes. Note that the one closer to the edge should be smaller, because it is farther away.
A bow tie makes it feel more like Easter, as well as some Easter-egg shapes to the side! Then, between two of the foot circles, you draw a V-shape. This is going to give the bunny some additional form. On the left side of the V, going down to the same foot circle but on the far left side, you make another line to show the bunny has a leg. Now, inside each of the foot circles, draw two straight lines to give him toes.
Step 3: Now we add the face. You can draw these lines a little harder than earlier because you won’t need to erase them. We work from our original circles and just kind of carve into them with our new lines. Remember to add pupils, too—and some grass to sit in.
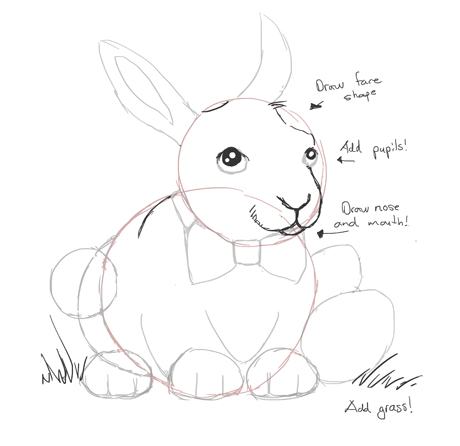 Step 4: Here comes the fun part! A bunny has fur, and now we are going to go over the shapes we have created and draw the outline of the bunny with small, “fussy” broken up lines that give the feeling of soft fur. You can apply more pressure to the pencil now.
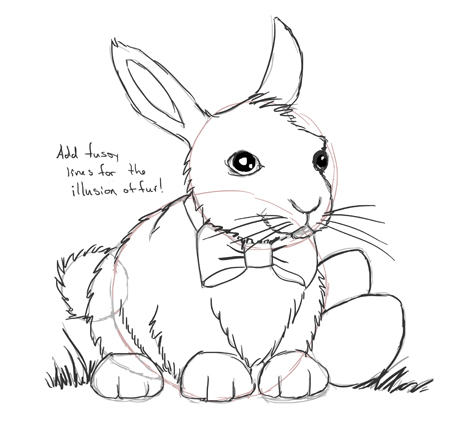 Afterwards, erase all of your extra help-lines from the previous steps. Also, don’t forget whiskers!
Step 5: The last step is simply adding some shading or color if you like! Go over your lines and make sure they stand out nice and clear. Erase any of your early, faint lines that remain.
 A fine fellow!


